

CHOCOLATE CHIP CHRISTMAS CAKE
This just may be my most delicious creation yet! OMG, is it good!
Here’s the story behind it, followed by the recipe.
Mr. X and I were going to a fun annual holiday fete, and, since I’m a nice girl, I was bringing a dessert. But I wanted it to be festive, special, and unique, which meant I had to once again come up with my very own recipe. And, knowing that if it turned-out well, I’d be sharing it with you, of course I also wanted it to be as easy-to-make as possible.
And, also of course, I was hoping for it to be absolutely yummy. And that it was! Mr. X went nuts over it. He can’t wait for me to make another one, especially now that I’ve perfected the recipe.
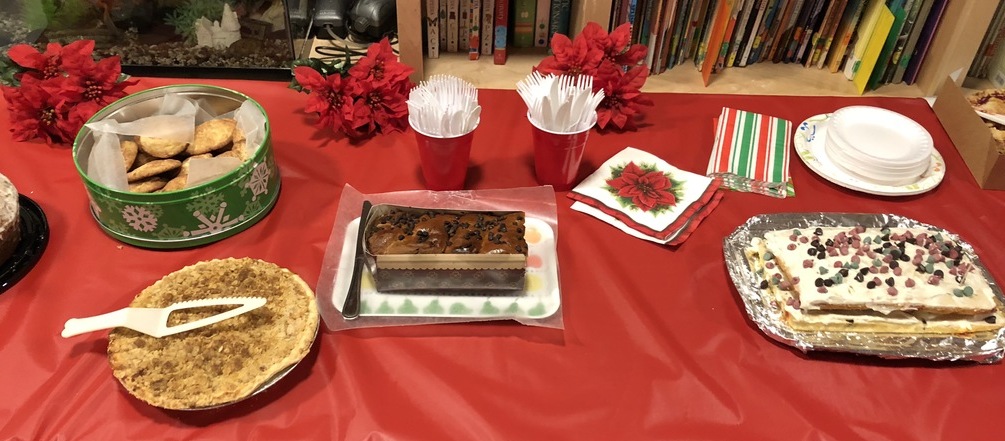
Part of the dessert buffet, with Karen Salkin’s Chocolate Chip Christmas Cake on the right. Photo by Karen Salkin, as is the big one at the top of this page.
Being that this is holiday time, I decided to go with making it colorful, but not in either a predictable or difficult-to-bake way.
So, I thought of what I already had on hand, and came up with this luscious, merry, and fun holiday cake. (At the end, I’ll tell you how you can adapt it to a few other important occasions.)
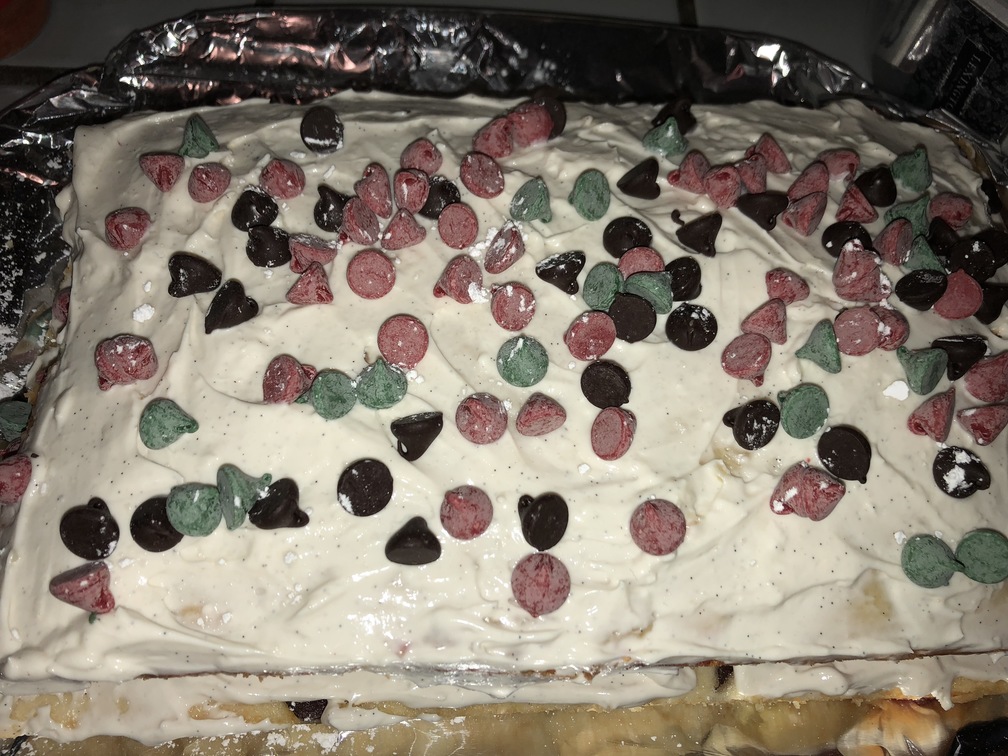
The finished product. Photo by Karen Salkin.
The frosting was almost a disaster, so I’m especially proud of myself for not only coming up with my own icing recipe, but for not panicking and getting it done with just a few minutes to spare before we had to leave! (I’ll explain that disaster after the main recipe for it!)
So here it is, my lovelies—the best Christmas Cake ever!!! [Note: I know the directions sound lengthy, because I have to tell stories about many of the steps, but I promise you, it does not take long to make at all!]
CHOCOLATE CHIP CHRISTMAS CAKE
INGREDIENTS
FOR THE ACTUAL CAKE
Light color boxed cake mix–white looks best, but yellow will substitute in a pinch.
One 10 oz. bag of holiday chocolate chips—the bag usually contains red, green, and brown chips, and we use them all.
FOR THE FROSTING
Cream cheese frosting is best here, but you can use any white frosting that you like. Store-bought works fine, but what I did takes a whole story to tell. (If you don’t have time to read it, just go with the one in the can.)
DIRECTIONS
Prepare the cake mix as directed on the box, reserving a tiny bit of the dry mix itself for the next step. (If you forget, and make it all wet before remembering, just use flour for that situation.)
This part is very important, to keep the chocolate chips from sinking into the cake batter, which not only ruins the look and taste of the cake, but makes a mess at the bottom of the pans! Put the chips (not the entire bag, but a nice portion of it) in a separate bowl, and toss them with a bit of the actual cake flour from the mix, before you use them. (That’s what you can use separate flour for, if need be.)

The two just-baked layers. Photo by Karen Salkin.
Pour the wet batter into the two well-greased pans. After the batter is in the pans, sprinkle the newly-floured chocolate chips on top, and then with a butter knife, gently swirl them in, to just below the surface. I promise you, these two tips make the cake perfect!
My cake box said to make it in two 9” round cake pans, but since I didn’t have those, I went to a “Baking Pan Conversion Chart.” You can find those all over the internet. But I still didn’t really have what they called for. So, I used two little bit different sized rectangle pans, and it still turned-out gorgeous.
My mix made two flat-ish layers, which was fine. I liked having two layers because—more frosting, of course!
Wait until the cakes are totally—and I do mean totally—cooled before frosting.
FROSTING STORY
So here’s the Frosting Story, including my own recipe for it, borne out of desperation:

Whipping-up that cream cheese frosting! Photo by Karen Salkin.
I had planned all along to use canned cream cheese frosting. But when I opened it, it was far from as fresh-tasting as I would have liked. So, I frantically searched for a recipe for homemade frosting on-line. The easiest one called for two full cups of confectioners sugar which, thank goodness, I had on hand, vanilla extract, milk, and two tablespoons of butter. I frantically whipped it up, but it tasted a bit odd to me. So I asked Mr. X to taste it, and he said it tasted like…fish! I realized later that I had used his healthful butter substitute, which contains Omega-3s, which is why it tasted like fish. Oysh.
I hated to scrap something that contained two whole cups of confectioners sugar, but I wasn’t going to foist fish-tasting icing on the party guests. So I had to calm myself down and come up with my own recipe with what I had on hand and in just a very few minutes. I have to admit that I was panicking. (I didn’t have enough confectioners sugar left, nor real butter, to re-do this one.)
I’m pleased to say that this is what I came up with, and it was soooo delicious that I plan to make this whole cake again. So here ’tis–my very own personal Emergency Cake Frosting recipe:
(The only problem with it is, since I whipped it up so quickly, I can’t tell you some of the exact amounts, so you just have to go with your own gut.)
CREAM CHEESE FROSTING INGREDIENTS
1 8 oz. container of whipped cream cheese
Splash of dairy or coconut milk
1 tsp. of vanilla extract or paste
Confectioners sugar, as needed for thickness and sweetness, so you have to judge that for yourself.
CREAM CHEESE FROSTING DIRECTIONS
Empty the cream cheese into a bowl, add the vanilla and milk, and whip on medium for a bit.
Then start adding the sugar a little a at time, tasting all the way. It should taste like a little bit sweetened cream cheese.
Add milk and sugar as needed until it’s to your own perfect taste.
CAKE ASSEMBLY
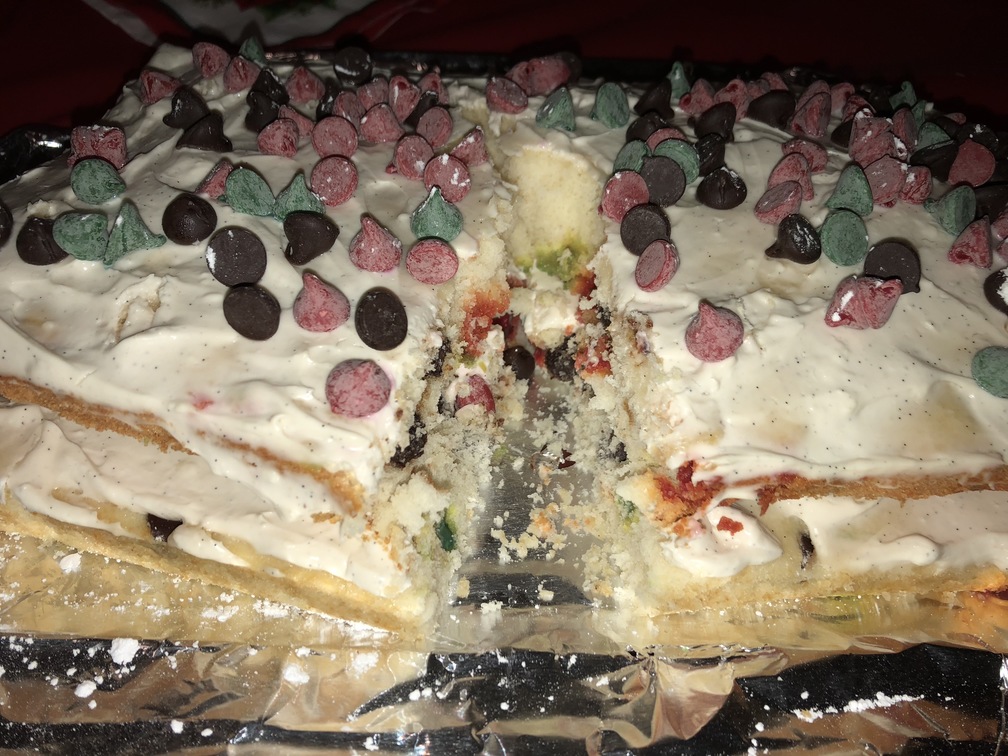
The inside of the cake when it’s cut open, to reveal the holiday chips! Photo by Karen Salkin.
Put the two cakes on separate trays and frost them gently. I kept it just the tops of the layers, but if you want to do the sides, too, that’s fine. I just think it’s more fun to leave them blank, so the colors of the chips can peek through.
Put more chips on the frosting of the bottom layer, top it with the other cake layer, and then sprinkle the rest of the chips on top of the whole shebang. Sprinkle a bit of confectioners sugar over it all for a polished look.
And that’s it!
Enjoy!!!
ADAPTATIONS (which I’m sure you can figure out for yourself, but just in case…)
For Halloween and Thanksgiving—pumpkin chips (and perhaps make it chocolate cake and frosting, too)
Valentines Day—red chips, of course
Saint Patrick’s Day—green chips–duh
Fourth of July—red, white, and blue chips, (which may be harder to find)
Happy Year-Round Holiday Cake Baking!


